|
||||||||
|
|
|
|
|
|
|
|
|
|
|
|
|
|
|
|||||
|
|
||||||||
|
|
|
|
|
|
|
|
|
|
|
|
|
|
|
|||||
|
|
| Files (MAX Scripts): |
This section contains all of my MAX Scripts that I have released. Please note the entire set is downloadable here as a Suite in a ZIP file. Alternatively you can see the screenshots and general information and download each one individually below.
|
cometScripts SUITE |
|
|
cometScripts MACRO-SUITE (ZIP) |
Requires: Max 4.26+ |
|
DESCRIPTION:
This ZIP contains ALL the scripts below in script form, as well as macroscript wrappers and icons so that you can easily add these to MAX's quads, menus, keyboard shortcuts and toolbars. Just download, and follow the instructions in the README for installation. Less than 300k download. All my MACRO versions of my scripts are placed in the "Comet Cartoons" category. I HIGHLY RECOMMEND YOU DOWNLOAD THIS ZIP vs. individual scripts, since it is easier to install and it allows you to easily add them to MAX's user interface.
|
|
You may also jump to a script by name starting with any of the following letters:
[ A ]
[ B ]
[ C ]
[ D ]
[ E ]
[ F ]
[ G ]
[ H ]
[ I ]
[ J ]
[ K ]
[ L ]
[ M ]
[ N ]
[ O ]
[ P ]
[ Q ]
[ R ]
[ S ]
[ T ]
[ U ]
[ V ]
[ W ]
[ X ]
[ Y ]
[ Z ]
|
Scripts: A |
|
|
|
|
Attribute Keyer 2.02 |
Requires: Max 4.20+ |
|
CATEGORY: Animation
DESCRIPTION: Similar to Maya's Channel Box, lets you key and view multiple animated parameters of all selected objects at once. This script allows you to easily:
Supported attribute types:
In addition, you can use the "POSE" feature to:
It only LOADs and SAVEs onto *selected* objects. So if you save a pose for an entire character rig, but want to reload onto only the hand, then all you have to do is select the hand object and load. This script works when Animate Mode is on. Which also means you can copy a pose from one frame, and paste it onto another. Version 2.0 now uses internal stringStreams so that things are quicker and use less RAM. It also now allows Custom Attributes with spaces in the name. Version 2.02 makes the U.I. cleaner in max r5. It also adds support for slider or spinner options during display.
|

|
|
|
|
|
Scripts: B |
|
|
|
|
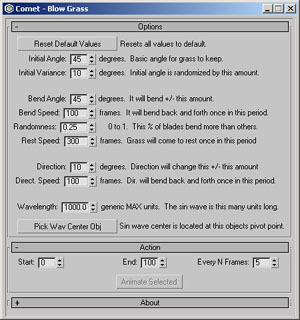
Blow Grass 1.5 |
Requires: Max 3.1+ |
|
CATEGORY: Animation
DESCRIPTION: Lets you automatically animate the "bend" modifier on multiple objects to simulate blowing grass. Animates the Bend Angle and Bend Direction on selected objects, such that the objects appear to be blowing, or bending from wind. You must manually create or scatter non-instanced objects with a bend modifier setup appropriately on them. An easy way to do that is to use the scatter-to-verts script found below to make copies of a simple object with a bend modifier, at the vertex locations, of say a simple ground plane. Control for the speed, amount, and rest times for the bending can be controlled. For this to look right, you typically want the bend modifier center, to be located at the base of the object. This version 1.5 now works properly in higher versions of MAX, like Max 6.
|
|
|
|
|
|
Scripts: C |
|
|
|
|
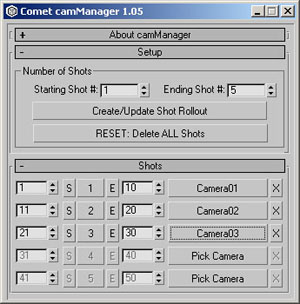
Camera Manager 1.05 |
Requires: Max 4.0+ |
|
CATEGORY: Animation
DESCRIPTION: This script allows you to control a single camera called "cameraMain" by "Target (ie: 2 point)" cameras and frame ranges. You specify:
The S|#|E buttons also allow you to quickly set the time slider/animation range to any shot, or to set the start or end time range to that shot. The "X" button allows you to remove a camera for a shot. You can also now "RESET" the camera list and data (not shown in picture). BUGS: It appears that the more cameras you add, the slower the processing gets when trying to play in realtime. This is because the scripts for the cameras get larger. One solution is to set all your cameras for each shot, but when working, work on a smaller shot range. ie: Set the shot range info to only be the shot, or few shots you are working on. Then before render, set the shot ranges to be the full # of shots.
|
|
|
|
|
Center Pivot |
Requires: Max 3.1+ |
|
CATEGORY: Modeling / Rigging
DESCRIPTION: This script centers the pivot point for all selected objects. This is the same as Maya's center pivot command. Useful if you add it as a macro script. (Or download as a Macro from the cometScripts SUITE Above).
|
No image. |
|
|
|
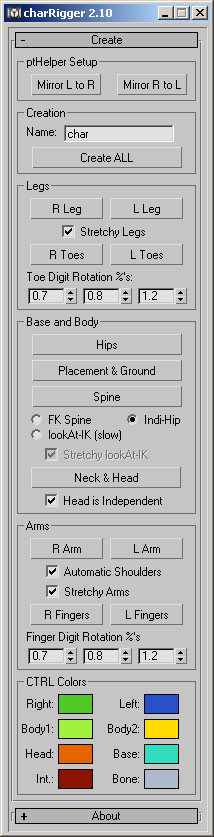
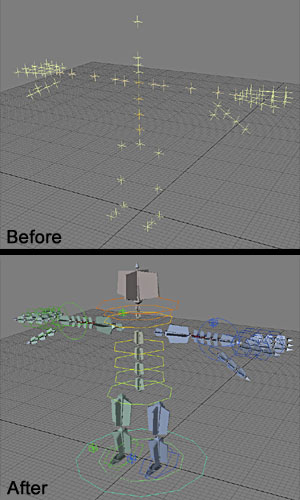
charRigger 2.10 (ZIP) |
Requires: Max 5.00+ |
|
CATEGORY: Rigging
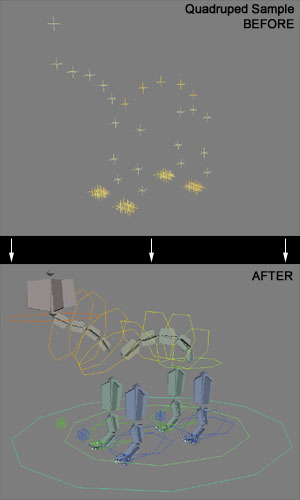
DESCRIPTION: This script takes a bunch of specific pointHelpers and auto creates a nice bone and control rig for character animation. This includes custom attributes and a stretchy bone and stretchy arm system, custom finger setup and more. The pictures here show one of the sample scene files included with the ZIP download, and how the rig looks after just pressing the "Create All" button. The Auto-Generated character rig and script has the following features (some are optional):
NOTE: This requires MAX 5.00 for the new spine lookAt-IK stuff...although other basic features will probably work in 4.20. However fingers and other items may also be wrong if ran in r4 vs. r5. Note too that the orientation of the "helper" objects has changed from r4 to r5 sample files, so that you need to use the new r5 helpers to get things like feet controls created properly. If you want you can download the charRigger 1.31 (ZIP) which is older but works in MAX 4.20 and higher. You will get errors if you have anything earlier than this, including 4.0 which will not work.
|
|
|
|
|
ConstrainAB 1.00 |
Requires: Max 4.26+ |
|
CATEGORY: Rigging
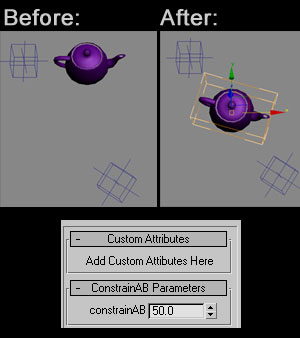
DESCRIPTION: This script Position and Orientation constrains one object between two others, with an animateable Custom Attribute for mixing between the two. This script works after you select 3 objects. The 3rd selected "slave" object is pos and rot constrained to the first two "masterA" and "masterB" selected objects. The slave object gets a Custom Attribute that allows you to mix between the two constraints. Good for setting up a in/out or local/world type control and also for doing a "3-arm fk/ik setup". For the latter you could use this on each bone, and then create a real control object and attribute wired right into each of the attributes that this thing makes.
|
|
|
|
|
|
Scripts: D |
|
|
|
|
|
Scripts: E |
|
|
|
|
eulerFix 1.00 |
Requires: Max 4.00+ |
|
CATEGORY: Animation
DESCRIPTION: This scriptdoes something similar to Maya's "Euler Filter" routine that will correct extra or bad interpolation of Euler Rotation keys. Many times in character animation you may see good poses, but inbetween your limbs or bones may flip or twist instead of interpolating nicely. This fixes that. How to work it:
What it does: What this does is ADJUST KEYFRAME VALUES such that the end result POSES "look" the same, but such that the difference from the previous frame is less. This means values will be adjusted for your keys. If you find a problem area where you WANTED it to remain as it was before the eulerFix ran...undo the eulerFix routine, and ADD an Extra Key frame inbetween the area that you want to keep. i.e.: Key an "inbetween" pose. Adding an inbetween (or if needed more than one) will cause eulerFix to not adjust that area and to leave it alone. Note: you must have the X, Y and Z rotation keys ALL AT THE SAME FRAME for this to catch and adjust those keys.
|
|
|
|
|
|
Scripts: F |
|
|
|
|
|
Scripts: G |
|
|
|
|
|
Scripts: H |
|
|
|
|
|
Scripts: I |
|
|
|
|
|
Scripts: J |
|
|
|
|
|
Scripts: K |
|
|
|
|
Key Manager 4.4 |
Requires: Max 4.0+ |
|
CATEGORY: Animation
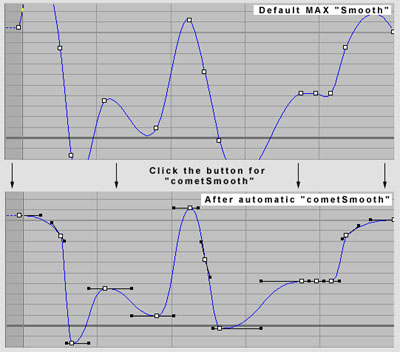
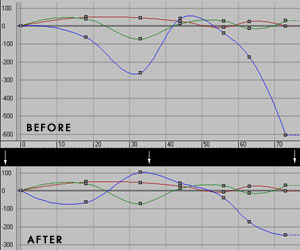
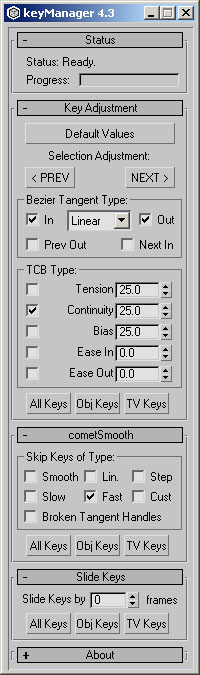
DESCRIPTION: This is a version of the Key Manager script originally by Randy Kreitzman. It allows you to adjust keys on multiple controllers or in the timeline, all at once. It also has an Auto-Tangent smoother that will make "smooth" spline curves without any overshoot. Features:
Smoothing can "ignore" certain key types, like smooth, fast, or custom. Note that the skip "broken" handles, will also skip "fast" since internally fast has tangent handles that aren't equal to each other.
Special Thanks to Nathan Tungesth for his idea of a fcurve smoothing tool. Note: the OLD version of this script which works in earlier versions of Max before Max 4.0, is available for download. Note it does not have as many features. Key Manager 1.0.4 MC5 - OLD VERSION
|
|
|
|
|
|
Scripts: L |
|
|
|
|
lightToggle 1.00 |
Requires: Max 4.0+ |
|
CATEGORY: Lighting
DESCRIPTION: This script will set any light (or other object that has an "enabled" state to alternate between Enabled or Disabled. Just select all the objects or lights, and run. Easy way to turn on and off a bunch of lights at once.
|
No image. |
|
|
|
|
Scripts: M |
|
|
|
|
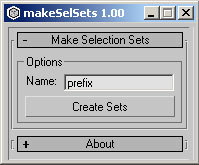
makeSelSets 1.00 |
Requires: Max 4.0+ |
|
CATEGORY: Animation
DESCRIPTION: This script will create selection sets based on a prefix name and proper suffix data as created by charRigger and such. Sets that don't have any objects matching/in them are removed. Some sets are defaulted to hidden, such as EndEffectors, Hidden and SETLO Note that charRigger sets names are varied slightly from what charRigger puts out itself. However, this is a useful script if you are importing a character rig from char rigger and have lost selection sets for it. It will also do geometry if you follow the naming conventions as below. Sets created are as follows:
prefix is the prefix as entered in the U.I.
Set Name:		    Object match pattern:
-------------------------------------------------
prefix_CTRLs		->  prefix_*CTRL
prefix_BONEs		->  prefix_*BONE
prefix_LITERig		->  prefix_*LITE
prefix_GEOMetry		->  prefix_*GEOM
prefix_HITEint		->  prefix_*INT
prefix_HIDEendEffectors	->  prefix_*EndEffectors
prefix_DELETEptHelpers	->  pt*
prefix_SETLO		->  prefix_*SETLO
prefix_SETHI		->  prefix_*SETHI
|
|
|
|
|
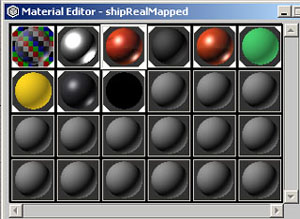
materialSelected 1.00 |
Requires: Max 4.0+ |
|
CATEGORY: Texturing
DESCRIPTION: This script will bring up the material editor, with ALL selected objects material placed in it for you. Just select your objects, and run. The material editor is reset to gray defaults first. Therefore, if no objects are selected then the material editor is reset to defaults.
|
|
|
|
|
|
Scripts: N |
|
|
|
|
|
Scripts: O |
|
|
|
|
|
Scripts: P |
|
|
|
|
cometParent 1.20 |
Requires: Max 4.0+ |
|
CATEGORY: Rigging
DESCRIPTION: This script does a "Maya-like" parenting operation, where all selected objects (but the last) are linked/parented to the last object you selected. Simply select the objects you want as children, select the parent last, and run the script. When finished, only the parent is selected. This is a MACROScript, so it's quick and easy to add as a keyboard shortcut. (I use 'p'). Like all my Macroscripts, found under the "Comet Cartoons" category. Marked as working in MAX 4.0, though it should work in Max 3.1 with no problems.
|
No image. |
|
|
|
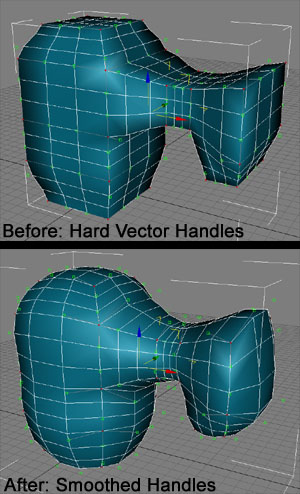
patchSmooth 1.00 |
Requires: Max 4.0+ |
|
CATEGORY: Modeling
DESCRIPTION: This script takes selected "Editable Patch" objects and then smooths out all the tangent handles to be normal to the surface, so that you get a nice smooth patch object.
|
|
|
|
|
|
Scripts: Q |
|
|
|
|
|
Scripts: R |
|
|
|
|
|
Scripts: S |
|
|
|
|
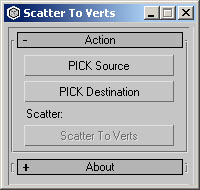
Scatter To Verts |
Requires: Max 3.1+ |
|
CATEGORY: Modeling / Rigging
DESCRIPTION: This will take the selected Source Object, and place a copy of that object at each vertex position of the Destination Object. The Destination object must be some form of an editable mesh type object. Orientation is left as it is. Useful for placing say a simple grass blade or other object with a modifier on it, at various locations onto another, such as for the Blow Grass script above.
|
|
|
|
|
selectAddTarget 1.01 |
Requires: Max 4.0+ |
|
CATEGORY: Lighting / Animation
DESCRIPTION: This script takes all current selected objects, and if they have "targets", selects the targets as well, keeping the inital objects still selected. For example, you can select a target camera and target spot light, but not their actual targets, run this script, and the targets are ADDED to the selection. This script can also be made a macro script on your shelf, and used from a hotkey or quad menu via that.
|
No image. |
|
|
|
setKeys 1.20 |
Requires: Max 4.0+ |
|
CATEGORY: Animation
DESCRIPTION: This script will automatically Set/Create Keyframes at the current time for the selected objects. It will create keys for ANY parameter that has been animated already. NOTE: You must still have Animate Mode ON. It also has options built in to the script so that by default, it will also force key creation for Position, Rotation, Scale and all Custom Attributes. (You can adjust easily by editing the top of the script). Essentially you can bind this script to the "s" key on the keyboard to run it, and it will set keys generally for what you want, just like Maya, including regular parameters in modifiers. Version 1.20 now works even if you have Custom Attributes with spaces in the name.
|
No image. |
|
|
|
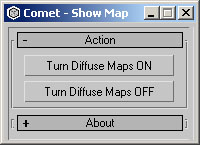
showMap |
Requires: Max 3.1 |
|
CATEGORY: Animation
DESCRIPTION: This will allow you to turn on or off visibility of all diffuse maps for materials in the viewport. This only works for diffuse maps on standard, or 1st level deep of multi-subObject materials.
|
|
|
|
|
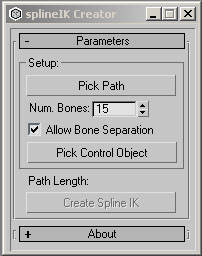
splineIK (ZIP) |
Requires: Max 4.0+ |
|
CATEGORY: Rigging
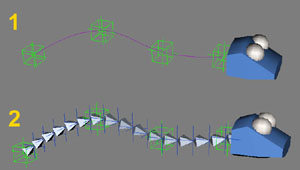
DESCRIPTION: This script allows you to create a splineIK bone chain similar to Maya's splineIK, but for MAX 4. It will let you choose a path, (can be closed), and then autocreates any number of MAX bones in a chain that are constrained to the path. When the path is animated (such as by linked-xform modifier), the bones will stick to the spline. Useful for things like tails, or dinosaur necks on characters. It will also create attributes for animating the roll/spin of the bones, a progessive twist-roll for twisting the end of the spline more than the base, and an offset attributes for shifting the entire chain along the path (mostly useful for closed paths). The download is a ZIP file including a full readme, the script, and a sample MAX file with a test dino-type neck animation as shown on the right here. BUGS: Unfortunately MAX's spline path has a "feature" where spinning a master control object on it will cause it to spin 180 or wig out. Because of this it means that this spline IK is somewhat useless for full moving rigs. If the spine doesn't have to rotate 180 then this will probably work (although it's not entirely different than using the spline right in the skin modifier directly). This script is still useful for doing things like animating an offset of bones along a path for things like rope or a conveyor belt type operation.
|
|
|
|
|
splineToMXS |
Requires: Max 4.0+ |
|
CATEGORY: Rigging
DESCRIPTION: This script allows to convert any selected Spline object(s) to MAXScript code that will recreate them. Just select any Line or Editable Spline shapes, and run. MAXScript functions that can recreate the shapes will be printed to the MAXScript listener window. You can then take that and create toolbar buttons from them, or add them into your own code. This is useful for creating control or helper objects for rigging. The newly created shapes made by the MAXScript functions will be at 0,0,0 and will retain the same original Wireframe color and object name as the original shape. (Although the names will be unique for 01, 02, 03 etc...). The points are exported relative to the object. So that the transform (ie: Position and orientation) of the object doesn't matter. Because of this, you MAY need to do a "Reset Xform" on the object before exporting to ensure that the created objects will be aligned right.
|
No image. |
|
|
|
snapPointOrient 1.10 |
Requires: Max 4.0+ |
|
CATEGORY: Rigging
DESCRIPTION: This script is similar to what Max's "Align Tool" does, except you can bind this to a nice hotkey or toolbar button. This will take all selected objects and snap them all to the position and orientation of the last selected object. Useful for rigging where you may need to quickly align an object to another, and you don't want to keep bringing up the align window and resetting options. Also unlike the built-in Align Tool, this will allow you to snap in a hierarchy so you can snap a parent object(s), to a childs original position. Version 1.10 Fixes a bug where the snap might not occur right for mirrored bones or bones.
|
No image. |
|
|
|
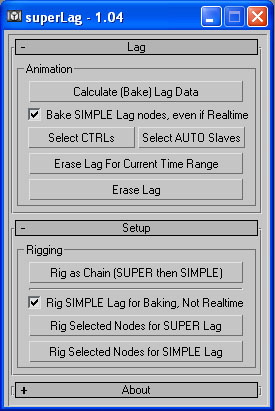
superLag 1.04 |
Requires: Max 4.0+ |
|
CATEGORY: Animation
DESCRIPTION: Super Lag is a MAX Script to help automate rigging and animation of secondary action and follow through. It provides easy to use animation controls, that are stable, and won't go flying off like typical dynamics or spring systems I have a nice HTML document for Help. This is included in the ZIP and viewable here online. To see it visit the superLag Documentation page.
|
|
|
|
|
|
Scripts: T |
|
|
|
|
Toggle Meshsmooth |
Requires: Max 4.0+ |
|
CATEGORY: Modeling / Animation
DESCRIPTION: This script toggles the Enabled/Disabled state for the topmost MeshSmooth modifier for all selected objects. If an object doesn't have MeshSmooth it is ignored. Probably good to add as a macroscript if desired.
|
No image. |
|
|
|
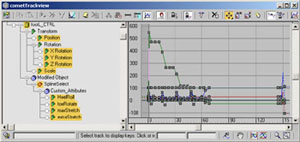
cometTrackview |
Requires: Max 4.0+ |
|
CATEGORY: Animation
DESCRIPTION:
This is a trackview script based on Neil Blevins original "trackviewReady" script. Makes a great macroscript or toolbar button.
|
|
|
|
|
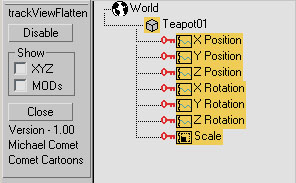
trackViewFlatten |
Requires: Max 5.00+ |
|
CATEGORY: Animation
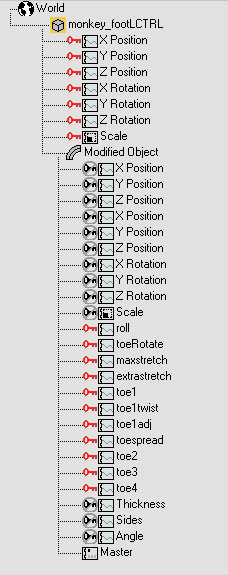
DESCRIPTION: This script is a Scripted TrackView Utility for Max r5 that will flatten out the hierarchy of the list in trackview. This is useful during animation, when you only want to see the leaf nodes in trackview. It works well with autoExpand Modifiers and Select Animated on...so that Custom Attributes even on modifiers and such will appear and be auto expanded and auto selected. There are options to temporarily disable the flattening. You can also show XYZ type master controller label, such as "Position" or "Rotation" on top of PositionX etc... You can also show Modifier name labels as well if desired. The U.I. can also be docked or undocked, and if you save TrackView's layout, it will auto-run next time trackview is opened. To run, execute the .ms file, or better, drop the .ms file into 3dsmax5\stdplugs\stdscripts\. Then open trackview, inside of trackview choose the "Utilities" menu and then "Track View Utilities...". In the list choose "trackViewFlaten - CometCartoons" and hit OK.
|
|
|
|
|
|
Scripts: U |
|
|
|
|
|
Scripts: V |
|
|
|
|
|
Scripts: W |
|
|
|
|
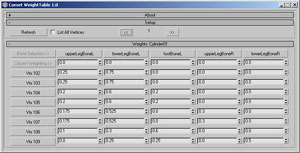
cometWeightTable 1.01 |
Requires: Max 4.0+ |
|
CATEGORY: Rigging
DESCRIPTION: This script does a Maya like Component editor, in that for the selected object, this will show the vertex "skin weights" for each bone in an editable table for the topmost skin modifier. Through editing the table, it allows you to easily set vertex weights for multiple vertices at once. This currently has a limit of showing 100 vertices at once since higher numbers may cause MAX to reboot your machine.
|
|
|
|
|
wireConnect 1.02 |
Requires: Max 4.0+ |
|
CATEGORY: Rigging
DESCRIPTION: This script does ONE WAY WIRING with a simpler object-to-object interface. It also shows Script Expression editing as well as range editing for objects. This is similar to Maya's Connection Editor, but with all the nice added features of MAX's wiring via script/expressions. This script allows you to easily:
Using the CTRL key when clicking in the Slave side easily lets you add or remove one item at a time from the connections. In addition, new connections use the script currently shown based on the pulldown list. So if you have a complex expression, you only need to write it once, and then CTRL+click on each additional item you wish to wire with that same expression. NOTE: In order to update the expression/script you must click on another control, or "Tab" out of the edit-text window so that MAX knows you have made a change. 1.02 Fixes a bug where if the "Master" objects item didn't have a controller assigned yet, it wouldn't show what was wired on the right side unless you refreshed the Master object after wiring.
|
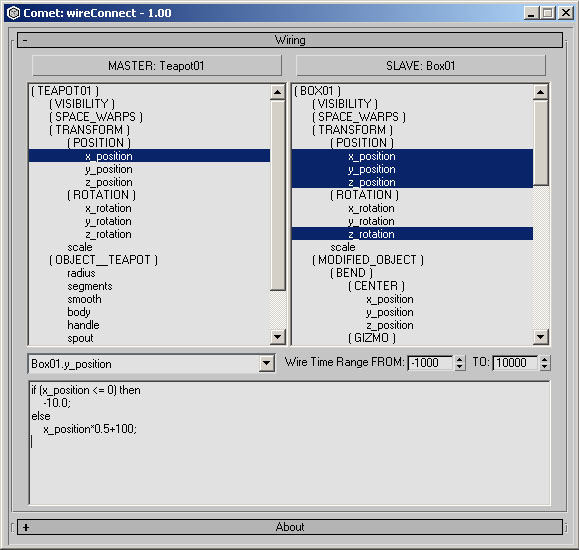
Click for Larger Image |
|
|
|
|
Scripts: X |
|
|
|
|
|
Scripts: Y |
|
|
|
|
|
Scripts: Z |
|
|
|
|
zeroOut 1.00 |
Requires: Max 4.0+ |
|
CATEGORY: Rigging
DESCRIPTION: This script will cause the Position, Rotation and Scale values for the selected object(s) to appear to be Zero (0) when viewed in parent space, or in the motion panel. A dummy object with the same initial PRS values is parented above this object in the hierarchy, which then causes this object, the child, to now appear to be zero. Just select objects, like bones in a bone chain, and run. Can work on multiple objects selected at once. Works well with attrKey which allows you to see the true PRS data and also reset the values to 0 easily. This makes it so that you can easily reset your character rig to "0" values.
|
No image. |
|
|
|